Wednesday, July 31, 2019

JMS | Java Message Service


JMS API is a Java message-oriented middleware API which contains a common set of interfaces to implement enterprise based messaging systems.

Benefit of using JMS are – loosely coupled application, reliability, and asynchronous communication between applications using JMS

ActiveMQ/ RabbitMQ is a popular message broker typically used for building integration between applications or different components of the same application using messages.

What is Message?
The message is a piece of information. It can be a text, XML document, JSON data or an Entity (Java Object) etc. The message is very useful data to communicate between different systems.

3 parts of message are:-

a)header :- It contains a number of  predefined fields using for proper delivery and routing.

b)body :- As the name suggests it is the body of messages. JMS API allows five types of message bodies.

        1.TextMessage :- Body contains String data

        2.ByteMessage :- Body contains byte data

        3. MapMessage :- Body contains data in key/value pair

        4.StreamMessage :-Body contains a stream of primitive  values

        5.ObjectMessage : – Body contains an object

        6.Message :- Nothing in body. Only header and properties.

c)properties :- Additional properties other than header.

JMS Architecture

JMS Architecture

How to Create a Simple JMS Queue in Weblogic Server 11g?

Create a JMS Server
Services > Messaging > JMS Servers
Select New -> 
Name: TestJMSServer
Persistent Store: (none)
Target: soa_server1 (or choose an available server)
Finish


The JMS server should now be visible in the list with Health OK.


Create a JMS Module


Services > Messaging > JMS Modules
Select New -> 
Name: TestJMSModule
Leave the other options empty
Target: soa_server1 (or choose an available server)
Leave “Would you like to add resources to this JMS system
module” unchecked
Finish

Create a JMS SubDeployment


Services > Messaging > JMS Modules
Select  -> TestJMSModule
Select the Subdeployments tab and New ->
Name: TestSubdeployment
Next
Here you can select the target(s) for the subdeployment. You can
choose either Servers (i.e. WebLogic managed servers, such as the
soa_server1) or JMS Servers such as the JMS Server created
earlier. As the purpose of our subdeployment in this example is to
target a specific JMS server, we will choose the JMS Server option.
Select theTestJMSServer created earlier

Finish

Create a Connection Factory

Create a JMS Queue


The JMS queue is now complete and can be accessed using the JNDI names

jms/TestConnectionFactory
jms/TestJMSQueue.

Send a Message to a JMS Queue?


import javax.jms.*;
import javax.naming.Context;
import javax.naming.InitialContext;
import javax.naming.NamingException;

String url = "";

 public final static String JNDI_FACTORY="weblogic.jndi.WLInitialContextFactory";

 public final static String JMS_FACTORY="jms/TestConnectionFactory";

 public final static String QUEUE="jms/TestJMSQueue";

Hashtable env = new Hashtable();
env.put(Context.INITIAL_CONTEXT_FACTORY, JNDI_FACTORY);
env.put(Context.PROVIDER_URL, url);

InitialContext ic = new InitialContext(env);
QueueConnectionFactory  qconFactory = (QueueConnectionFactory) ctx.lookup(JMS_FACTORY);
QueueConnection qcon = qconFactory.createQueueConnection();
QueueSession qsession = qcon.createQueueSession(false, Session.AUTO_ACKNOWLEDGE);
Queue queue = (Queue) ctx.lookup(QUEUE);

QueueSender qsender = qsession.createSender(queue);
TextMessage msg = qsession.createTextMessage();
msg.setText(message);

qcon.start();
qsender.send(msg);

qsender.close();
qsession.close();
qcon.close();
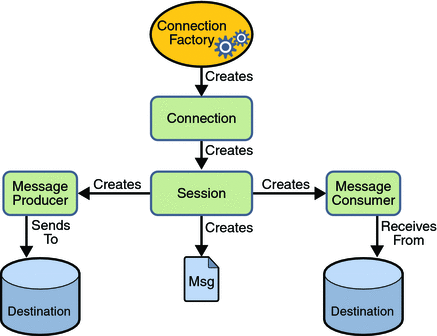

jms programming model


Receive a Message from a JMS Queue?

import javax.jms.*;  

public class MyListener implements MessageListener {  
  
    public void onMessage(Message m) {  
        try{  
        TextMessage msg=(TextMessage)m;  
      
        System.out.println("following message is received:"+msg.getText());  
        }catch(JMSException e){System.out.println(e);}  
    }  


createQueueSession(false, Session.AUTO_ACKNOWLEDGE);
true -> transacted [commit(), rollback()]
false -> non -transacted

AUTO_ACKNOWLEDGE
CLIENT_ACKNOWLEDGE
DUPS_OK_ACKNOWLEDGE


JMS API supports the sending of any Serializable object as ObjectMessage object .

how an object is sent as a message between two client applications.
FirstClient.java creates an EventMessage object and sends it to the destination.
SecondClient.java is receiving the same EventMessage object from the same destination.


public class EventMessage implements Serializable {

private static final long serialVersionUID = 1L;

private int messageId;

private String messageText = "";

public EventMessage(int id, String messageText) {

this.messageId = id;

this.messageText = messageText;


}


producer = session.createProducer(destination);
EventMessage eventMessage = new EventMessage(1,"Message from FirstClient");
ObjectMessage objectMessage = session.createObjectMessage();
objectMessage.setObject(eventMessage);
producer.send(objectMessage);

consumer = session.createConsumer(destination);
Message message = consumer.receive();
if (message instanceof ObjectMessage) {
Object object = ((ObjectMessage) message).getObject();
System.out.println(this.getClass().getName()
+ "has received a message : " + (EventMessage) object);


TDD


Test-driven development (TDD)

is a software development process that relies on the repetition of a very short development cycle: first the developer writes an (initially failing) automated test case that defines a desired improvement or new function, then produces the minimum amount of code to pass that test, and finally refactors the new code to acceptable standards.

TDD is being quickly adopted by agile software developers for development of application source code and is even being adopted by Agile DBAs for database development.
  • Add a test
  • Run all tests and see if the new one fails
  • Write some code
  • Run tests
  • Refactor code
  • Repeat
Keep in mind that the idea behind TDD is to do the necessary minimum to make the tests pass and repeat the process until the whole functionality is implemented. At this moment we're only interested in making sure that "the method can take 0, 1 or 2 numbers". Run all the tests again and see them pass.

Benefits

Writing the tests first requires you to really consider what do you want from the code.
You receive fast feedback.
TDD creates a detailed specification.
TDD reduces time spent on rework.
You spend less time in the debugger.
You are able to identify the errors and problems quickly.


CI/CD Pipeline | modern DevOps process

CI/CD:- It bridges the gap between development and operations teams by automating the building, testing, and deployment of applications.

CI stands for Continuous Integration and CD stands for Continuous Delivery/Continuous Deployment. 

We can think of CI/CD as a process similar to a software development lifecycle.


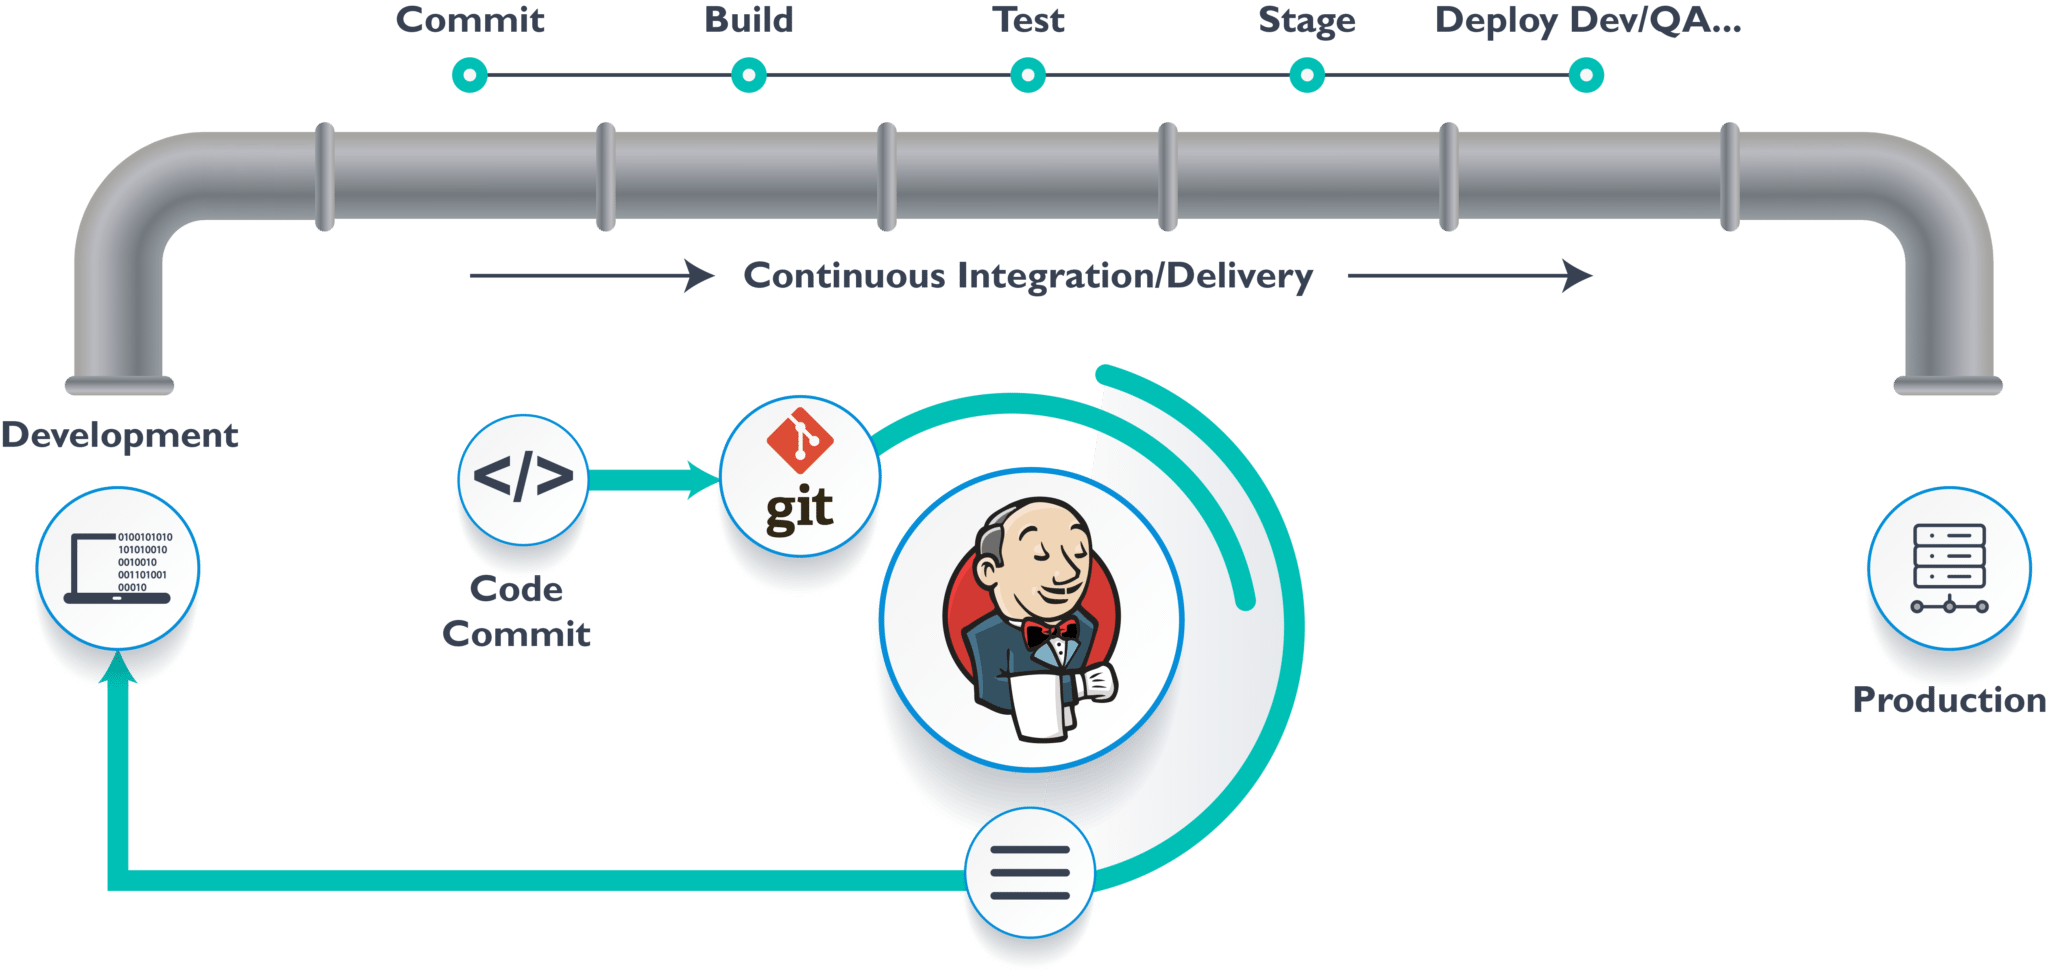
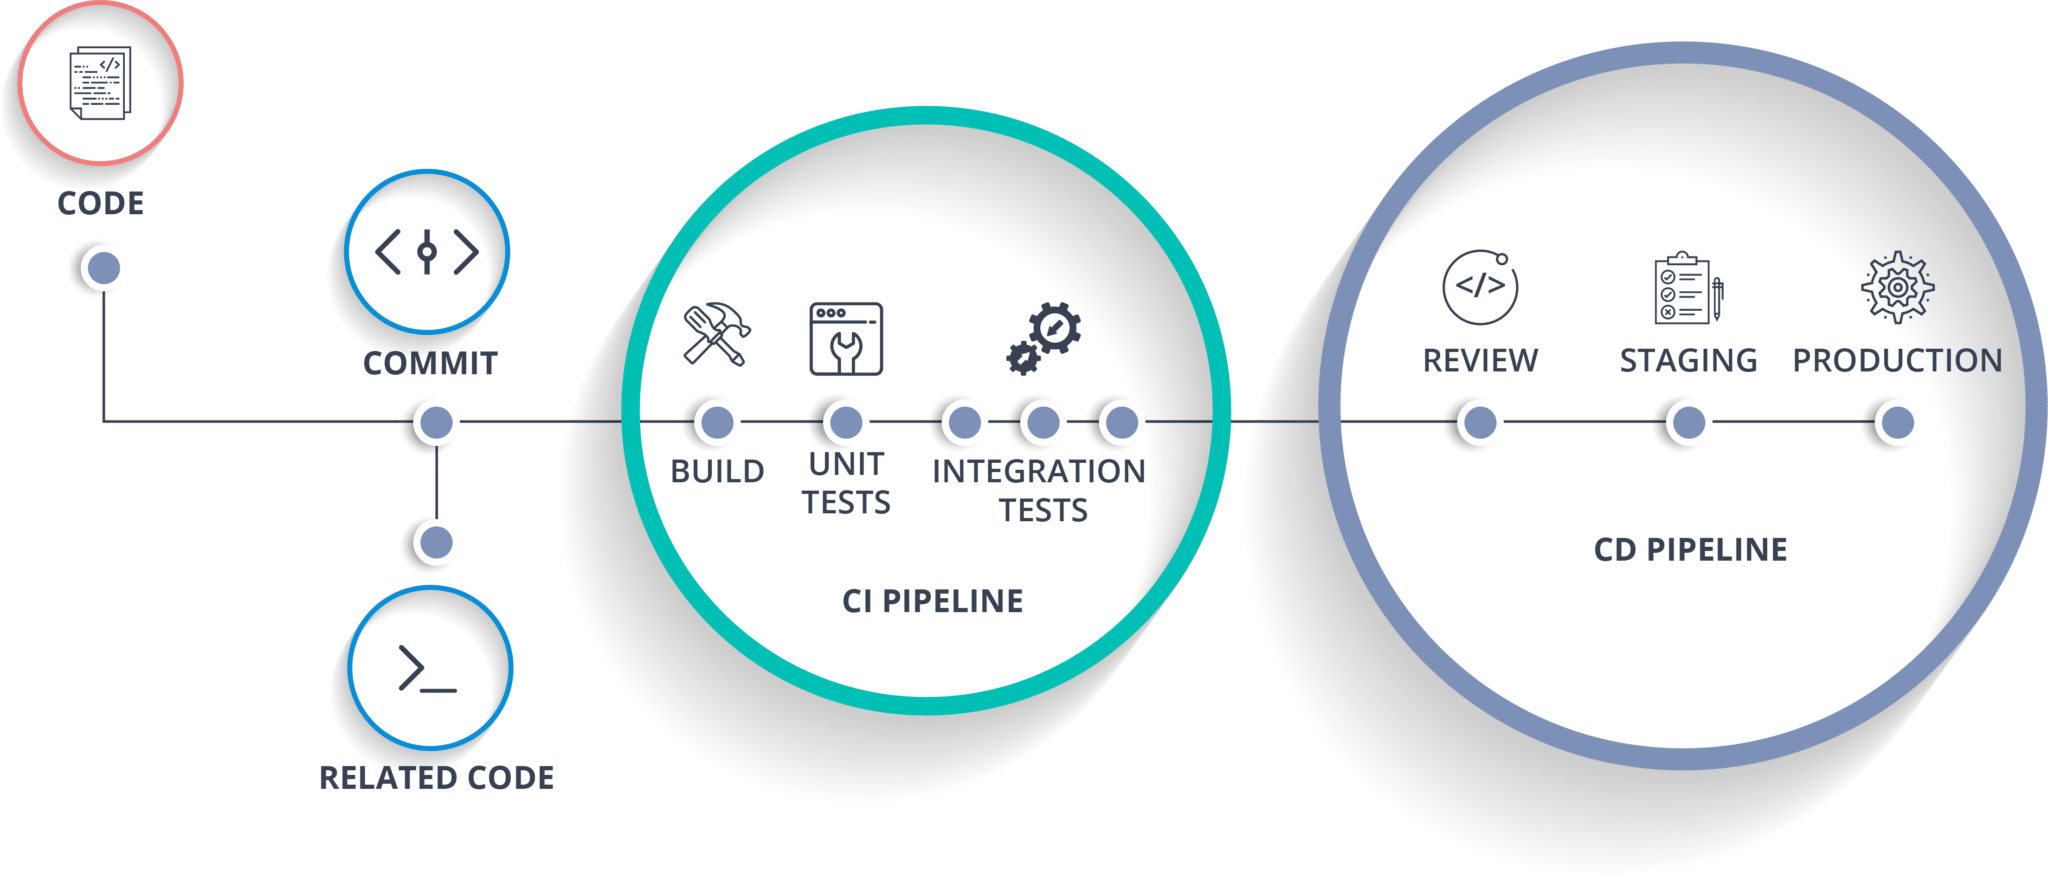
The above pipeline is a logical demonstration of how software will move along the various stages in this lifecycle before it is delivered to the customer or before it is live in production.

web application ->
1. developers responsible for writing and committing code to version control system (git, svn)
2. developers build the web application [build/compilation phase]
3. after build phase, testing phase started [unit test]
4. when test completed, you move to deploy phase where you deploy it into a staging or a test server. Here, you can view the app in a simulator.
5. Once the code is deployed successfully, you can run another sanity test. If everything is accepted, then it can be deployed to production.

So the ultimate goal of CI/CD process is to automate this above entire process.

We will automate the pipeline in order to make the entire software development lifecycle in DevOps/automated mode. 


We can define entire job or the task.

From Git, Jenkins pulls the code and then Jenkins moves it into the commit phase, where the code is committed from every branch. The build phase is where we compile the code. If it is Java code, we use tools like maven in Jenkins and then compile that code, which can be deployed to run a series of tests. These test cases are overseen by Jenkins again.
Then, it moves on to the staging server to deploy it using Docker. After a series of unit tests or sanity tests, it moves on to production.


The CI/CD pipeline is one of the best practices for devops teams to implement, for delivering code changes more frequently and reliably.

Continuous Integration (CI) is a development practice that requires developers to implement small changes and check in code to version control system/ repositories frequently. Each check-in is then verified by an automated build, allowing teams to detect problems early. 

Continuous delivery(CDpicks up where continuous integration ends. CD automates the delivery of applications to selected infrastructure environments. Most teams work with multiple environments other than the production, such as development and testing environments, and CD ensures there is an automated way to push code changes to them.  CD automation then performs any necessary service calls to web servers, databases, and other services that may need to be restarted or follow other procedures when applications are deployed.

Benefits
there is significantly less back-tracking to discover where things went wrong, so you can spend more time building features.
Continuous Integration is cheap
Catch issues early and nip them in the bud
Spend less time debugging and more time adding features
Stop waiting to find out if your codes going to work
Reduce integration problems allowing you to deliver software more rapidly

Thursday, July 25, 2019

Method/Class level variable | Java Heap Space and Stack Memory

public class Memory {

public static void main(String[] args) { // Line 1
int i=1; // Line 2
Object obj = new Object(); // Line 3
Memory mem = new Memory(); // Line 4
mem.foo(obj); // Line 5
} // Line 9

private void foo(Object param) { // Line 6
String str = param.toString(); //// Line 7
System.out.println(str);
} // Line 8

}

As soon as we run the program, it loads all the Runtime classes into the Heap space. When main() method is found at line 1, Java Runtime creates stack memory to be used by main() method thread.
We are creating primitive local variable at line 2, so it’s created and stored in the stack memory of main() method.
Since we are creating an Object in line 3, it’s created in Heap memory and stack memory contains the reference for it. Similar process occurs when we create Memory object in line 4.
Now when we call foo() method in line 5, a block in the top of the stack is created to be used by foo() method. Since Java is pass by value, a new reference to Object is created in the foo() stack block in line 6.
A string is created in line 7, it goes in the String Pool in the heap space and a reference is created in the foo() stack space for it.
foo() method is terminated in line 8, at this time memory block allocated for foo() in stack becomes free.
In line 9, main() method terminates and the stack memory created for main() method is destroyed. Also the program ends at this line, hence Java Runtime frees all the memory and end the execution of the program.


Based on the above explanations, we can easily conclude following differences between Heap and Stack memory.

Heap memory is used by all the parts of the application whereas stack memory is used only by one thread of execution.
Whenever an object is created, it’s always stored in the Heap space and stack memory contains the reference to it. Stack memory only contains local primitive variables and reference variables to objects in heap space.
Objects stored in the heap are globally accessible whereas stack memory can’t be accessed by other threads.
Memory management in stack is done in LIFO manner whereas it’s more complex in Heap memory because it’s used globally. Heap memory is divided into Young-Generation, Old-Generation etc, more details at Java Garbage Collection.
Stack memory is short-lived whereas heap memory lives from the start till the end of application execution.
We can use -Xms and -Xmx JVM option to define the startup size and maximum size of heap memory. We can use -Xss to define the stack memory size.
When stack memory is full, Java runtime throws java.lang.StackOverFlowError whereas if heap memory is full, it throws java.lang.OutOfMemoryError: Java Heap Space error.
Stack memory size is very less when compared to Heap memory. Because of simplicity in memory allocation (LIFO), stack memory is very fast when compared to heap memory.


Local/method level-

place - declared inside method and block
scope - visible only in method and block
existence time - created when method is called and destroyed when method exits
default values - must be initialised before use otherwise it won’t compile
allocation - stack memory
don’t have to worry about concurrent access to local variables

Instance/class level-
place - declared inside class
scope - visible to all methods in class
existence time - Instance variables are created using new operator OR when class is loaded and destroyed by garbage collector when there is no reference to them.
default values - initialisation is not mandatory; if omitted then take default values 0,0.0,false,null
allocation - heap memory
have to worry about instance variables in a multi threaded env

_____________________________________________________________________


Java memory model | Java memory profiling | Garbage Collection


Java memory model 

Once we launch the JVM, the operating system allocates memory for the JVM process. 

Process includes the Heap, Meta Space, JIT code cache, thread stacks, and shared libraries. We call this native memory. 

How much memory the OS allocates to the JVM process depends on the operating system, processor, and the JRE. Let me explain the different memory blocks available for the JVM.

Heap Memory: JVM uses this memory to store objects. This memory is in turn split into two different areas called the “Young Generation Space” and “Tenured/Old Generation Space“.

Java Memory Model, JVM Memory Model, Memory Management in Java, Java Memory Management


Young Generation: The Young Generation or the New Space is divided into two portions called “Eden Space” and “Survivor Space".

Eden Space: When we create an object, the memory will be allocated from the Eden Space.

Survivor Space: This contains the objects that have survived from the Young garbage collection or Minor garbage collection. We have two equally divided survivor spaces called S0 and S1.

Tenured Space: The objects which reach to max tenured threshold during the minor GC or young GC, will be moved to “Tenured Space” or “Old Generation Space“.

Meta Space | Method Area | Constant Pool  :This memory is out of heap memory and part of the native memory. As per the document by default the meta space doesn’t have an upper limit. In earlier versions of Java we called this “Perm Gen Space". This space is used to store the class definitions/metadata loaded by class loaders. This is designed to grow in order to avoid 0ut of memory errors. However, if it grows more than the available physical memory, then the operating system will use virtual memory. This will have an adverse effect on application performance, as swapping the data from virtual memory to physical memory and vice versa is a costly operation. We have JVM options to limit the Meta Space used by the JVM. In that case, we may get out of memory errors.

Since the garbage collection on this Space is not much effective to clean up as required, applications with large code-base can quickly fill up this segment which will cause java.lang.OutOfMemoryError: PermGen no matter how high your -Xmx and how much memory you have on the machine.
After then, no application shall run on that machine effectively even after having a huge empty JVM.

Before starting your application you should java -XX:MaxPermSize to get rid of this error.

Code Cache: JVM has an interpreter to interpret the byte code and convert it into hardware dependent machine code. As part of JVM optimization, the Just In Time (JIT) compiler has been introduced. The frequently accessed code blocks will be compiled to native code by the JIT and stored it in code cache. The JIT compiled code will not be interpreted.

_____________________________________________________________________

Garbage Collection: (Minor GC and Major GC)

The young generation is the place where all the new objects are created. When the young generation is filled, garbage collection is performed. This garbage collection is called Minor GC.

Most of the newly created objects are located in the Eden memory space. When Eden space is filled with objects, Minor GC is performed and all the survivor objects are moved to one of the survivor spaces.

Minor GC also checks the survivor objects and move them to the other survivor space. So at a time, one of the survivor space is always empty.

Objects that are survived after many cycles of GC, are moved to the Old generation memory space. Usually, it’s done by setting a threshold for the age of the young generation objects before they become eligible to promote to Old generation.

Old Generation memory contains the objects that are long-lived and survived after many rounds of Minor GC. Usually, garbage collection is performed in Old Generation memory when it’s full. Old Generation Garbage Collection is called Major GC and usually takes a longer time.

Stop the World Event
All the Garbage Collections are “Stop the World” events because all application threads are stopped until the operation completes.

Since Young generation keeps short-lived objects, Minor GC is very fast and the application doesn’t get affected by this.

However, Major GC takes a long time because it checks all the live objects. Major GC should be minimized because it will make your application unresponsive for the garbage collection duration. So if you have a responsive application and there are a lot of Major Garbage Collection happening, you will notice timeout errors.

The duration taken by garbage collector depends on the strategy used for garbage collection. That’s why it’s necessary to monitor and tune the garbage collector to avoid timeouts in the highly responsive applications.

Perm Gen objects are garbage collected in a full garbage collection (Major GC).

Collection Framework

Data Structure is a way to store and organize data so that it can be used efficiently.  For example, we can store a list of items having the same data-type using the array data structure.

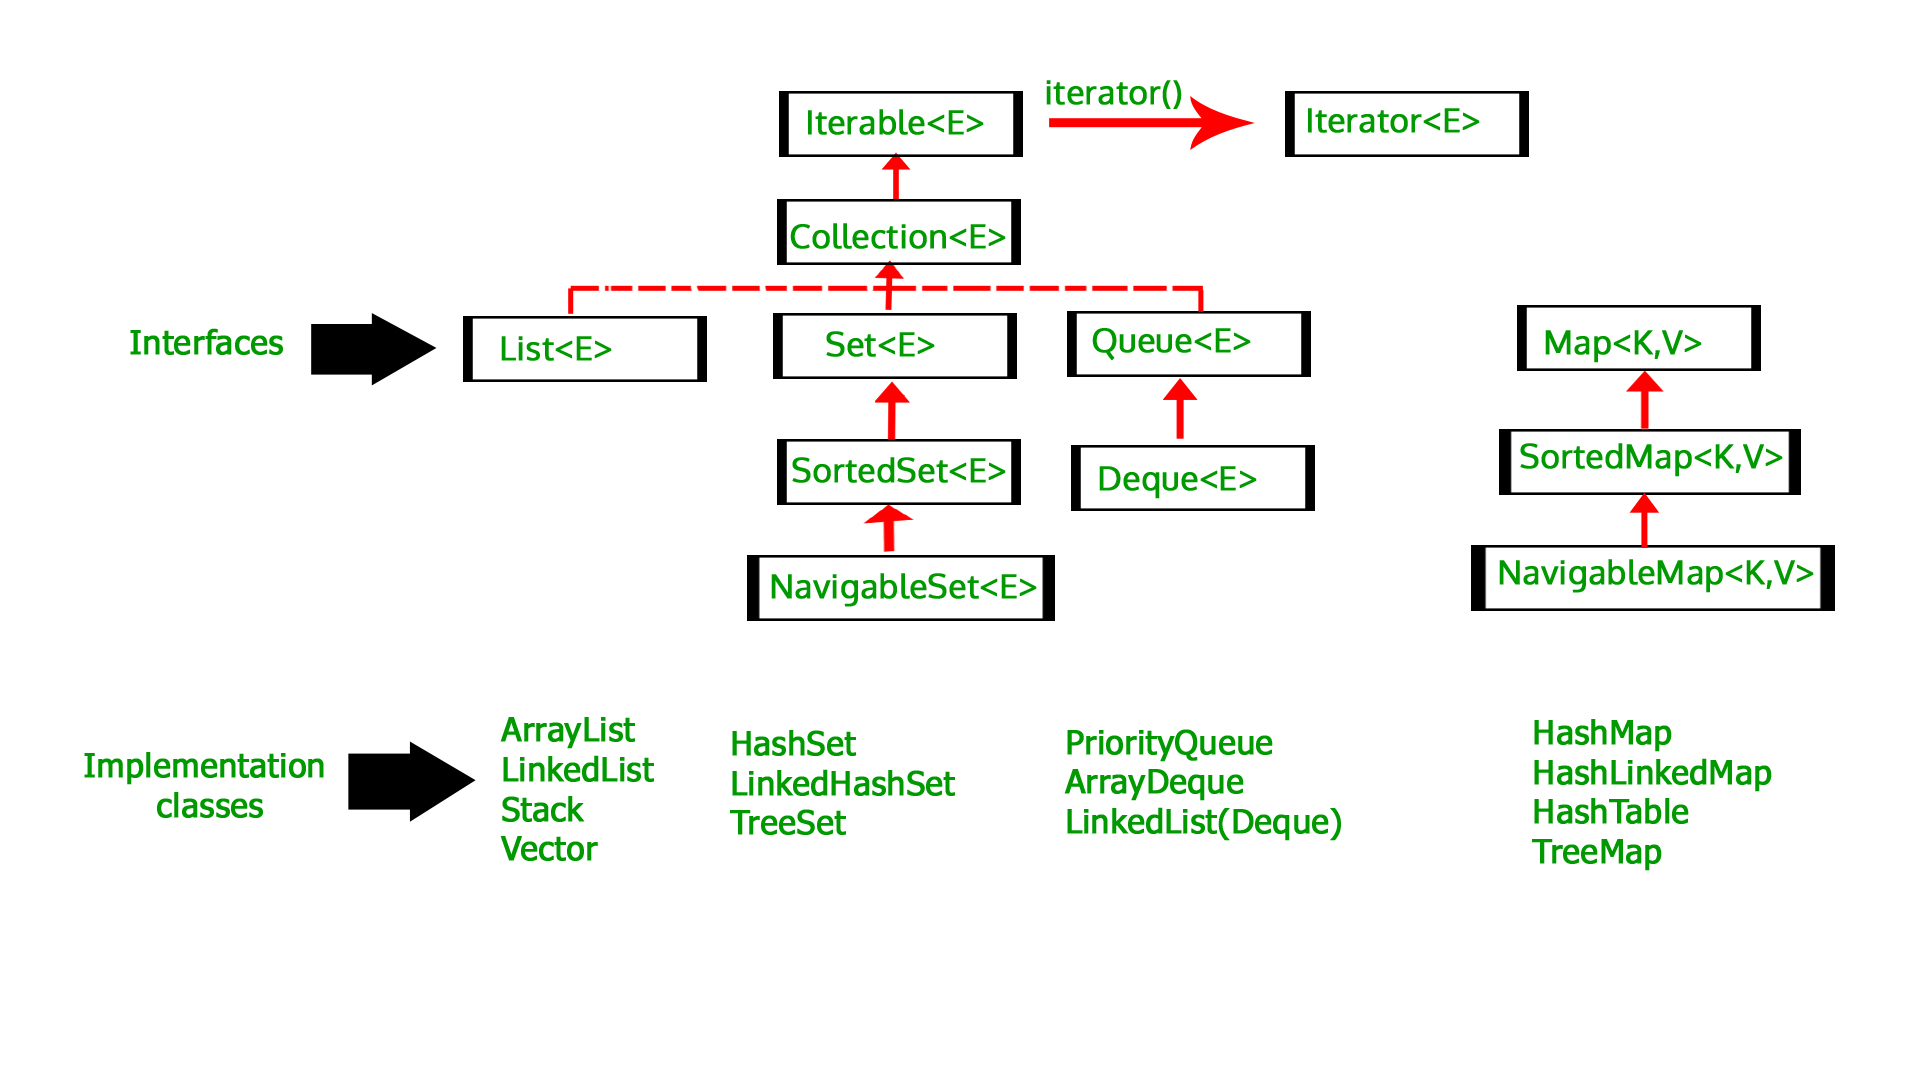
A Collection is a group of individual objects represented as a single unit.

Java provides Collection Framework which defines several classes and interfaces to represent a group of objects as a single unit.

Two main “root” interfaces of Java collection classes:-

Collection interface (java.util.Collection)
Map interface (java.util.Map)

Need for Collection Framework :
Before Collection Framework (or before JDK 1.2) was introduced, the standard methods for grouping Java objects (or collections) were Arrays or Vectors or Hashtables. All of these collections had no common interface.


java-arraylist

Array vs ArrayList

Array -
  • fixed size data structure.
  • can contain both primitive data types as well as objects of class.
  • mandatory to provide size of Array, once Array is created we can’t change length of it.
ArrayList -
  • dynamic size data structure.
  • supports object entries not primitive data types.
  • java will create Arraylist with default size, resize itself when gets full depending upon capacity and load factor.  mechanism will be creating new Array and copying content from old array to new array.
int newCapacity = (oldCapacity * 3)/2 + 1;

=10*3/2 + 1
=30/2+1
=15+1=16

Default initial capacity - 10
Load factor - 1 ( when the list is full)

Growth rate - current size + current size /2
____________________________________________________________________________

ArrayList vs LinkedList

Similarities:-
  • both maintain the elements insertion order
  • non synchronised 
  • fail-fast iterator(if list is structurally modified at any time after the iterator is created, in any way except through the iterator’s own remove or add methods, the iterator will throw a ConcurrentModificationException)
Differences:-
  • Search
  • ArrayList - O(1)
  • LinkedList - O(n)
  • Deletion
  • ArrayList - O(n), O(1)
  • LinkedList - O(1)
  • Insert
  • ArrayList - O(n), O(1)
  • LinkedList - O(1)
  • Memory Overhead
  • ArrayList - less
  • LinkedList- high
____________________________________________________________________________

HashSet | LinkedHashSet | TreeSet

HashSet
  • doesn’t maintain any order, the elements would be returned in any random order.
  • doesn’t allow duplicates.
  • allows null values.
  • non synchronised.
  • Fail Fast iterator
LinkedHashSet
  • maintains the insertion order.
  • allows null values.
TreeSet
  • sorts the elements in ascending order.
  • doesn’t allow null values.
____________________________________________________________________________

HashMap | LinkedHashMap | TreeMap

HashMap - 
unordered data structure
non synchronised
allows null values

LinkedHashMap - 
ordered data structure
allows null values

TreeMap - 
sorts the elements in ascending order of keys.

____________________________________________________________________________

Load factor

Load factor represents at what level data structure capacity should be doubled/increased.

HashMap

Default initial capacity - 16

Default load factor- 0.75

capacity * load factor 

16 * 0.75 = 12

This represents that after storing 12th  key-value pair into the HashMap, its capacity becomes 32.

Monday, July 15, 2019

Automating JUnit Tests | Continuous Integration (CI)

Continuous Integration := CI is a concept and it was introduced to prevent integration issues. In CI, developers commit the code periodically, and every commit is built. Automated tests verify the system integrity. It helps in the incremental development and periodic delivery of the working software.

When CI is not available, development teams or developers make changes to code and then all the code changes are brought together and merged. Sometimes, this merge is not very simple; it involves the integration of lots of conflicting changes.

Often, after integration, weird bugs crop up and a working module may start to fail, as it involves a complete rework of numerous modules. Nothing goes as planned and the delivery is delayed. As a result, the predictability, cost, and customer service are affected.

CI requires a listener tool to keep an eye on the version control system for changes. Whenever a change is committed, this tool automatically compiles and tests the application (sometimes it creates a WAR file, deploys the WAR/EAR file, and so on).

If compilation fails, or a test fails, or deployment fails, or something goes wrong, the CI tool immediately notifies the concerned team so that they can fix the issue.

Tools such as Sonar and FindBugs can be added to the build process to track the code quality, and they automatically monitor the code quality and code coverage metrics. Often, CI tools have the ability to present dashboards pertaining to quality metrics.

In a nutshell, CI tools enforce code quality, predictability, and provide quick feedback, which reduces the potential risk. CI helps to increase the confidence in the build. A team can still write very poor quality code, even test poor quality code, and the CI will not care.

Numerous CI tools are available on the market, such as Go, Bamboo, TeamCity, CruiseControl, and Jenkins. However, CruiseControl and Jenkins are the widely used ones.

Saturday, July 13, 2019

jUnit && Mockito code-driven unit testing framework


Junit – 4, 4++, 5

Test:- it is the validation of functional and nonfunctional requirements before it is shipped to a customer.

Unit testing means performing the sanity check of code.
Sanity check is a basic test to quickly evaluate whether the result of a calculation can possibly be true.
It is a simple check to see whether the produced material is coherent.

Use Case:-

It's a common practice to unit test the code using print statements in the main method or by executing the application.
Neither of them is the correct approach.

Mixing up production code with tests is not a good practice. Testing logic in the production code is a code smell, though it doesn't break the code under the test. However, this increases the complexity of the code and can create severe maintenance problem or cause system failure if anything gets misconfigured.

Print statements or logging statements are executed in the production system and print unnecessary information. They increase execution time and reduce code readability. Also, junk logging information can hide a real problem, for instance, you may overlook a critical deadlock or a hung thread warning because of excessive logging of junk.


Unit testing is a common practice in test-driven development (TDD). TDD is a development approach where the production code is written only to satisfy a test, and the code is refactored to improve its quality. Basically, It offers test-first development.
In TDD, unit tests drive the design.

Java code can be unit tested using a code-driven unit testing framework.

The following are a few of the available code-driven unit testing frameworks for Java:
• SpryTest
• Jtest
• JUnit
• TestNG

JUnit is the most popular and widely used unit testing framework for Java.

Junit – code-driven unit testing framework for java, It is an annotation-based, flexible framework.

Apparently, TestNG is cleaner than JUnit, but JUnit is far more popular than TestNG.
JUnit has a better mocking framework support such as Mockito, which offers a custom JUnit 4 runner.

Exploring annotations
The @Test annotation represents a test.
Any public method can be annotated with the @Test annotation with @Test to make it a test method. There's no need to start the method name with test.

We need data to verify a piece of code. For example, if a method takes a list of students and sorts them based on the marks obtained, then we have to build a list of students to test the method. This is called data setup.

JUnit 4 provides a @Before annotation. If we annotate any public void method of any name with @Before, then that method gets executed before every test execution. Similarly, any method annotated with @After gets executed after each test method execution.

JUnit 4 provides two more annotations:
@BeforeClass and @AfterClass.

They are executed only once per test class. The @BeforeClass and @AfterClass annotations can be used with any public static void methods. The @BeforeClass annotation is executed before the first test and the @AfterClass annotation is executed after the last test. The following example explains the annotation usage and the execution sequence of the annotated methods.

Verifying test conditions with Assertion

Assertion is a tool (a predicate) used to verify a programming assumption (expectation) with an actual outcome of a program implementation; for example, a programmer can expect that the addition of two positive numbers will result in a positive number. So, he or she can write a program to add two numbers and assert the expected result with the actual result.

The org.junit.Assert package provides static overloaded methods to assert expected and actual values for all primitive types, objects, and arrays.

The following are the useful assert methods:

assertTrue(condition)
assertFalse(condition)
assertNull
assertNotNull
assertEquals(string message, object expected, object
actual)
assertEquals(object expected, object actual) := i.equals(j) and not i == j . Hence, only the values are compared, not the references
assertEquals(primitive expected, primitive actual)
assertSame(object expected, object actual) := passes only when the expected object and the actual
object refer to the same memory location.
assertNotSame(object expected, object actual) := fails only when the expected object and the actual object refers to the same memory location.

if the actual value doesn't match the expected value, AssertionError is thrown.

Working with exception handling
an API needs three objects; if any argument is null, then the API should throw an exception. This can be easily tested. If the API doesn't throw an exception, the test will fail.

@Test(expected=RuntimeException.class)
public void exception() {
throw new RuntimeException();}

Exploring the @RunWith annotation


Junit 4++


Ignoring a test

@Test
@Ignore("John's holiday stuff failing")
public void when_today_is_holiday_then_stop_alarm() {
}

Executing tests in order

@FixMethodOrder(MethodSorters.NAME_ASCENDING)
public class TestExecutionOrder { ... }

Learning assumptions

Exploring the test suite

To run multiple test cases, JUnit 4 provides Suite.class and the @Suite.SuiteClasses annotation. This annotation takes an array (comma separated) of test classes.

@RunWith(Suite.class)
@Suite.SuiteClasses({ AssertTest.class, TestExecutionOrder.class, Assumption.class })
public class TestSuite {
}

Create a TestSuite class and annotate the class with @RunWith(Suite.class) .
This annotation will force Eclipse to use the suite runner instead of using the built-in runner.

Asserting with assertThat

Web Development

Design Phase:- Below all these represent different stages of the UX/UI design flow:- Wireframes represent a very basic & visual repr...