Saturday, January 2, 2016

Spring Framework

Spring Framework:- Spring is an open source container based framework used for building Java and J2EE applications (either web or standalone). The framework is widely used mainly in enterprise applications. It is built on top of two design concepts – Dependency Injection and Aspect Oriented Programming.
We have various modules for specific tasks under spring framework like 
Spring Context – for dependency injection.
Spring AOP – for aspect oriented programming.
Spring DAO – for database operations using DAO pattern
Spring JDBC – for JDBC and DataSource support.
Spring ORM – for ORM tools support such as Hibernate
Spring Web Module – for creating web applications.
Spring MVC – for creating web applications, web services etc.


Spring Container is a piece of code which reads spring bean configuration file and responsible for creating the objects,managing them, wiring them together, configuring them, as also managing their complete lifecycle. 
Eg. BeanFactory and ApplicationContext.
The org.springframework.beans and org.springframework.context packages provide the basis for the Spring Framework’s IoC container.

Inversion of control means now we have inverted the control of creating the object from our own using new operator to container or framework. Now it’s the responsibility of container to create object as required. We maintain one xml file where we configure our components, services, all the classes and their property. We just need to mention which service is needed by which component and container will create the object for us.


Spring configuration file
Spring configuration file is called Spring Bean definition file.This file contains all configuration metadata/classes information which is needed for the container to know how to create a bean, register it, maintains its lifecycle and know about which beans/dependencies are needed.


You can declare your class and configured it to the framework by using XML or annotation or java based.

XML
<bean id="userService" class="com.sivalabs.myapp.service.UserService">
    <property name="userDao" ref="userDao"/>
</bean>

<bean id="userDao" class="com.sivalabs.myapp.dao.JdbcUserDao">
    <property name="dataSource" ref="dataSource"/>
</bean>

<bean id="dataSource" class="org.apache.commons.dbcp.BasicDataSource" destroy-method="close">
    <property name="driverClassName" value="com.mysql.jdbc.Driver"/>
    <property name="url" value="jdbc:mysql://localhost:3306/test"/>
    <property name="username" value="root"/>
    <property name="password" value="secret"/>
</bean>
 
Annotation
@Service
public class UserService
{
    private UserDao userDao;

    @Autowired
    public UserService(UserDao dao){
        this.userDao = dao;
    }
    ...
    ...
}
 
@Repository
public class JdbcUserDao
{
    private DataSource dataSource;

    @Autowired
    public JdbcUserDao(DataSource dataSource){
        this.dataSource = dataSource;
    }
    ...
    ...
}
 
Java  
@Configuration
public class AppConfig
{
    @Bean
    public UserService userService(UserDao dao){
        return new UserService(dao);
    }

    @Bean
    public UserDao userDao(DataSource dataSource){
        return new JdbcUserDao(dataSource);
    }

    @Bean
    public DataSource dataSource(){
        BasicDataSource dataSource = new BasicDataSource();
        dataSource.setDriverClassName("com.mysql.jdbc.Driver");
        dataSource.setUrl("jdbc:mysql://localhost:3306/test");
        dataSource.setUsername("root");
        dataSource.setPassword("secret");
        return dataSource;
    }
} 
 
Spring Without Annotations
-> create maven project
-> add dependencies
-> create source folder -> src/main/resources
-> create applicationContext.xml/spring configuration file -> beans definition
<beans spring-beans,spring-context>
<bean id>
</bean>
</beans>
-> create bean/class
-> enter bean id, class, property name in applicationContext.xml file
-> main class ->
1) load applicationContext
2) initiate bean by calling getBean() method, not by new operator
3) do stuff


Spring With Annotations
-> create maven project
-> add dependencies
-> create source folder -> src/main/resources
-> create applicationContext.xml/spring configuration file -> beans definition
<beans spring-beans,spring-context>
<bean id>
</bean>
</beans>
-> create bean/class and put required @annotations over the bean
-> enter <context:annotation-config/> and <context:component-scan base-package="*path of base package*"/> applicationContext.xml file
-> main class ->
1) load applicationContext
2) initiate bean by calling getBean() method, not by new operator
3) do stuff


Reflection
Class is the start point of using Java reflection API. We can use Class.forName("classname") to get a Class descriptor and then initialize an object, invoke methods, etc. Reflection is used in spring framework.


Spring uses bean configuration such as:
<bean id="someID" class="com.example.Foo">
<property name="someField" value="someValue" />
</bean>
When the Spring context processes this <bean> element, it will use Class.forName(String) with the argument "com.example.Foo" to instantiate that Class.

It will then again use reflection to get the appropriate setter for the <property> element and set its value to the specified value.

Design Patterns being used in Spring framework
List of Core/Common GoF / J2EE Design Patterns which are internally used by Spring / based upon:


1. MVC - The advantage with Spring MVC is that your controllers are POJOs as opposed to being servlets. This makes for easier testing of controllers.

2. Front controller - Spring provides "DispatcherServlet" to ensure an incoming request gets dispatched to your controllers.

3. View Helper - Spring has a number of custom JSP tags, and velocity macros, to assist in separating code from presentation in views.

4. Singleton - Beans defined in spring config files are singletons by default.

5. Prototype - Instance type can be prototype.

6. Factory - Used for loading beans through BeanFactory and ApplicationContext.

7. Builder - Spring provides programmatic means of constructing BeanDefinitions using the builder pattern through Class "BeanDefinitionBuilder".

8. Template - Used extensively to deal with boilerplate repeated code (such as closing connections cleanly, etc..). For example JdbcTemplate.

9. Proxy - Used in AOP & Remoting.

10. DI/IOC - It is central to the whole BeanFactory/ApplicationContext stuff.


11. Observer -

Autowiring two different beans of same class / Multiple beans referring to the same class?

A class which wraps a connection pool, the class gets its connection details from a spring configuration as shown below:

<bean id="jedisConnector" class="com.legolas.jedis.JedisConnector" init-method="init" destroy-method="destroy">
<property name="host" value="${jedis.host}" />
<property name="port" value="${jedis.port}" />
</bean>

<bean id="jedisConnectorPOD" class="com.legolas.jedis.JedisConnector" init-method="init" destroy-method="destroy">
<property name="host" value="${jedis.pod.host}" />
<property name="port" value="${jedis.pod.port}" />
</bean>

=> @Resource

@Resource(name="jedisConnector")
JedisConnector beanA;

@Resource(name="jedisConnectorPOD")
JedisConnector beanB;

@Resource
JedisConnector jedisConnector;

@Resource
JedisConnector jedisConnectorPOD;

=> @Autowired with @Qualifier
@Autowired
@Qualifier("jedisConnector")
JedisConnector beanA;

@Autowired
@Qualifier("jedisConnectorPOD")
JedisConnector beanB;


if bean scope is singleton by default then how it's creating two different objects?

Singleton has a slightly different meaning in spring - it's not about guaranteeing 1 instance per class. It just means every time you call "context.getBean("jedisConnector")" you'll get the same object, as opposed to "prototype" which means getting a different instance each time to call context.getBean("jedisConnector")

try this

Object x1=context.getBean("
jedisConnector");
Object x2=context.getBean("
jedisConnector");

If "
jedisConnector" is singleton you'll get the same reference. If prototype you'll get two separate instances.

Spring Bean Life cycle
ApplicationContext/BeanFactory is responsible for managing life cycle of beans.

CallBack Interfaces

Aware Interfaces

Spring Bean Scopes
singleton - only one instance of bean per spring container.
This bean scope is default and it enforces the container to have only one instance per spring container irrespective of how much time you request for its instance. This singleton behavior is maintained by bean factory itself.

prototype - a new instance every time bean is requested
This bean scope just reverses the behavior of singleton scope and produces a new instance each and every time a bean is requested.

Request, Session and Global Session scopes are valid in the context of a web-aware Spring ApplicationContext(WebApplicationContext). This means that you can only use these scoped beans in a an application deployed to a web server. Spring can be used in applications that run in standard JVMs along with applications that run in servlet containers (Tomcat, etc). Request, Session and Global session however, only exists in web servers so it has no meaning if the application is running in a standard desktop environment.
If you use these scopes with regular Spring IoC containers such as the ClassPathXmlApplicationContext, you get an IllegalStateException complaining about an unknown bean scope.

request - single bean instance per http request.
a new bean instance will be created for each web request made by client. As soon as request completes, bean will be out of scope and garbage collected.

session - single bean instance per http session.
This ensures one instance of bean per user session. As soon as user ends its session, bean is out of scope.

global-session - single bean instance per global http session.
It is a little different in sense that it is used when application is portlet based. In portlets, there will be many applications inside a big application and a bean with scope of ‘global-session’ will have only one instance for a global user session that is shared among all of the various portlets that make up a single portlet web application.


application - a single bean definition to the lifecycle of a ServletContext. Only valid in the context of a web-aware Spring ApplicationContext.

- An object of ServletContext is created by the web container at time of deploying the project.
- There is only one ServletContext object per web application.

websocket - a single bean definition to the lifecycle of a WebSocket. Only valid in the context of a web-aware Spring ApplicationContext.


Difference between session / request?
scope="session"
means through out the application ( till the session gets expired). Your can keep the values in session no matter how many JPSs you are visiting of that application. It remains there in session until you close your browser.

scope="request"
means for that particular action only you are keeping the values. In this if you call another action or redirects to another JSP , it gets removed.


Difference between application / request?
Application scope is for whole application and request is for just a request by the client.

Tuesday, December 22, 2015

Spring container

Spring container is at the core of the Spring Framework. The container will create the objects, wire them together, configure them, and manage their complete lifecycle from creation till destruction. The Spring container uses dependency injection (DI) to manage the components/beans that make up an application.
The container gets its instructions on what objects to instantiate, configure, and assemble by reading configuration metadata file provided. The configuration metadata can be represented either by XML, Java annotations, or Java code. The following diagram is a high-level view of how Spring works. The Spring IoC container makes use of Java POJO classes and configuration metadata to produce a fully configured and executable system or application. 

Spring provides following two distinct types of containers.
Spring BeanFactory Container
This is the simplest container providing basic support for DI and defined by the org.springframework.beans.factory.BeanFactory interface. The BeanFactory and related interfaces, such as BeanFactoryAware, InitializingBean, DisposableBean, are still present in Spring for the purposes of backward compatibility with the large number of third-party frameworks that integrate with Spring.


Spring ApplicationContext Container
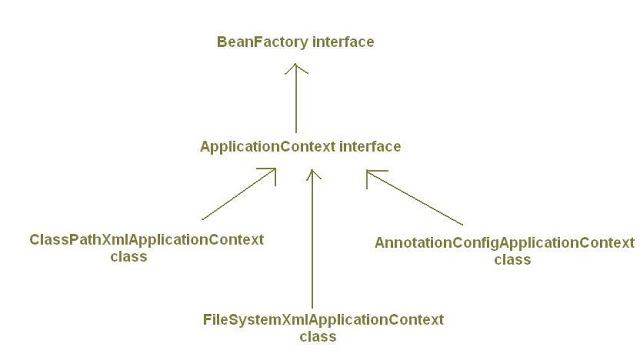
ApplicationContext is used to represent Spring Container. It is built upon BeanFactory interface.
BeanFactory provides basic functionality while ApplicationContext provides advance features to our spring applications which make them enterprise level applications, like i18n, event publishing, JNDI access, EJB integration, Remoting etc.


ApplicationContext and Singleton beans:
While using BeanFactory, beans get instantiated when they get requested first time, like in getBean("bean_id") method, not when object of BeanFactory itself gets created. This is known as lazy-instantiation.


But while using ApplicationContext, singleton beans does not get created lazily. By default, ApplicationContext immediately instantiates the singleton beans and wire/set its properties as it's object itself gets created. So ApplicationContext loads singleton beans eagerly (pre-instantiated).


If we had used BeanFactory here, mybean would get instantiated when the method getBean(mybean) would  be called.


But here with ApplicationContext, instantiation of bean with id mybean does not get delayed until getBean() method is called. If scope of the bean mybean  is declared in configuration file as singleton, it will be immediately instantiated when we create ApplicationContext object acObj. So when getBean() would be called, mybean would already have got loaded and its dependencies set.


We can change this default behavior so that ApplicationContext does not load singleton beans eagerly by using  lazy-init attribute as:


<bean id="mybean" class="x.y.z..MyBean" lazy-init="true"/>


A lazy-initialized bean tells the Spring to create a bean instance when it is first requested, rather than at the time of creation of ApplicationContext object.


=== > Write a simple Spring Application which will print "Hello World!" or any other message based on the configuration done in Spring Beans Configuration file.
  1. Maven Project
  2. add spring-core and spring-context dependency to pom.xml
  3. create source folder -> src/main/resources
  4. create spring configuration file named applicationContext.xml. You have to make sure that this file is available in CLASSPATH and use the same name in main application while creating application context.
  5. assign unique IDs to different beans.
<?xml version="1.0" encoding="UTF-8"?>

<beans xmlns="http://www.springframework.org/schema/beans"
   xmlns:xsi="http://www.w3.org/2001/XMLSchema-instance"
   xsi:schemaLocation="http://www.springframework.org/schema/beans
   http://www.springframework.org/schema/beans/spring-beans-3.0.xsd">

  <bean id="helloWorld" class="com.tutorialspoint.HelloWorld">
      <property name="message" value="Hello World!"/>
  </bean>
<!-- Error# Not Valid, it should be unique-->
  <bean id="helloWorld" class="com.tutorialspoint.HelloWorld">
      <property name="message" value="Hello World!"/>
  </bean>
<!-- Valid -->
  <bean id="helloWorldX" class="com.tutorialspoint.HelloWorld">
      <property name="message" value="Hello World!"/>
  </bean>

</beans>


  1. first step is to create Application Context / Spring Container that loads spring configuration file and takes care of creating and initializing all objects/beans defined in configuration file.
  2. second step is to get required bean using getBean() method of created context. This method uses bean ID to return a generic object which finally can be casted to actual object. Once you have object, you can use this object to call any class method.


When Spring applicationcontext gets loaded into the memory, Framework makes use of the above configuration file to create and initialize all the spring beans defined and assign them a unique ID as defined in <bean> tag. You can use <property> tag to pass the values of different variables used at the time of object creation.


<bean id> <property>.. </property> </bean>


For spring to process annotations regardless of XML based, add the following lines in your spring bean configuration file.
<context:annotation-config />
<context:component-scan base-package="...specify your package name..." />


Spring supports both Annotation based and XML based configurations. You can even mix them together. Annotation injection is performed before XML injection, thus the latter configuration will override the former for properties wired through both approaches.
The default bean-name / id for a @Component or derivative (@Controller, @Service, etc.) is the unqualified class name with a lower first character. In order to have those two components together, just set a different bean name (for at least one of them):
@Component"secondFooComponent")
Bean Scope
When defining a <bean> in Spring, you have the option of declaring a scope for that bean.
1) to return a new bean instance each time one is needed, you should declare the bean's scope attribute to be prototype.
2) to return the same bean instance each time one is needed, you should declare the bean's scope attribute to be singleton.
3) return a single bean instance per HTTP request. *, you should declare the bean's scope attribute to be request.
4) return a single bean instance per HTTP session. *, you should declare the bean's scope attribute to be session.


5) return a single bean instance per global HTTP session. *, you should declare the bean's scope attribute to be globalSession.
In most cases, you may only deal with the Spring’s core scope – singleton and prototype, and the default scope is singleton.
* means only valid in the context of a web-aware Spring ApplicationContext
<!-- A bean definition with singleton scope -->
<bean id="..." class="..." scope="singleton">
   <!-- collaborators and configuration for this bean go here -->
</bean>
OR
@Service
@Scope("prototype")


Spring Beans are standard Java objects which are instantiated, initialized and managed by Spring Container.
Beans are mostly used to:
→ Configure Spring in some way (database connection parameters, security, and so on)
→ Avoid hard coding dependencies using dependency injection, so that our classes
remain self-contained and unit testable.


Spring Web MVC framework
DispatcherServlet/FrontController : Spring’s web MVC framework is designed around a central Servlet called DispatcherServlet that dispatches requests to controllers using handler mappings. Like a normal servlet DispatcherServlet also needs to be configured in the web deployement Descriptor(web.xml). By default DispatcherServlet Class will look for a name xxx-servlet.xml to load the Spring MVC configuration.
<web-app>
   <servlet>
       <servlet-name>dispatcher</servlet-name>
       <servlet-class>org.springframework.web.servlet.DispatcherServlet</servlet-class>
       <load-on-startup>1</load-on-startup>
   </servlet>
   <servlet-mapping>
       <servlet-name>dispatcher</servlet-name>
       <url-pattern>/</url-pattern>
   </servlet-mapping>
</web-app>
In the Web MVC framework, each DispatcherServlet has its own WebApplicationContext, which inherits all the beans already defined in the root WebApplicationContext. These inherited beans can be overridden in the servlet-specific scope, and you can define new scope-specific beans local to a given Servlet instance.
Upon initialization of a DispatcherServlet, Spring MVC looks for a configuration file named [servlet-name]-servlet.xml in the WEB-INF directory of your web application and creates the beans defined there, overriding the definitions of any beans defined with the same name in the global scope.
→ You can change the exact location of this configuration file through a Servlet initialization parameter. It is also possible to have just one root context for single DispatcherServlet scenarios.
This can be configured by setting an empty contextConfigLocation servlet init parameter, as shown below:
<web-app>
   <context-param>
       <param-name>contextConfigLocation</param-name>
       <param-value>/WEB-INF/root-context.xml</param-value>
   </context-param>
   <servlet>
       <servlet-name>dispatcher</servlet-name>
       <servlet-class>org.springframework.web.servlet.DispatcherServlet</servlet-class>
       <init-param>
           <param-name>contextConfigLocation</param-name>
           <param-value></param-value>
       </init-param>
       <load-on-startup>1</load-on-startup>
   </servlet>
   <servlet-mapping>
       <servlet-name>dispatcher</servlet-name>
       <url-pattern>/*</url-pattern>
   </servlet-mapping>
   <listener>
       <listener-class>org.springframework.web.context.ContextLoaderListener</listener-class>
   </listener>
</web-app>

Spring - Bean Lifecycle

The life cycle of a Spring bean is easy to understand. When a bean is created, it may be required to perform some initialization to get it into a usable state. Similarly, when the bean is no longer required and is removed from the container, some cleanup may be required.
Though, there is lists of the activities that take place behind the scenes between the time of bean Instantiation and its destruction, but this chapter will discuss only two important bean lifecycle callback methods which are required at the time of bean initialization and its destruction.
To define setup and teardown for a bean, we simply declare the <bean> with init-method(@PostConstruct) and/or destroy-method(@PreDestroy) parameters. The init-method attribute specifies a method that is to be called on the bean immediately upon instantiation. Similarly, destroy-method specifies a method that is called just before a bean is removed from the container.
public class ExampleBean {

public void init() {
// do some initialization work
}
void destroy() throws Exception;

}
<bean id="exampleBean"
class="examples.ExampleBean"
init-method="init"
destroy-method="destroy"
/>


@Service
Annotate all your service classes with @Service. All your business logic should be in Service classes.


@Service
public class CompanyServiceImpl implements CompanyService {
...
}


@Repository
Annotate all your DAO classes with @Repository. All your database access logic should be in DAO classes.


@Repository
public class CompanyDAOImpl implements CompanyDAO {
...
}


@Component
Annotate your other components (for example REST resource classes) with @Component.


@Component
public class ContactResource {
...
}


@Component is a generic stereotype for any Spring-managed component. @Repository, @Service, and @Controller are specializations of @Component for more specific use cases, for example, in the persistence, service, and presentation layers, respectively.

@Autowired
Let Spring auto-wire other beans into your classes using @Autowired annotation.


@Service
public class CompanyServiceImpl implements CompanyService {
@Autowired
 private CompanyDAO companyDAO;
  
 ...
}
Spring beans can be wired by name or by type.
@Autowire by default is a type driven injection. @Qualifier spring annotation can be used to further fine-tune autowiring.
@Resource (javax.annotation.Resource) annotation can be used for wiring by name.
Beans that are themselves defined as a collection or map type cannot be injected through @Autowired, because type matching is not properly applicable to them. Use @Resource for such beans, referring to the specific collection or map bean by unique name.
@Transactional
Configure your transactions with @Transactional spring annotation.
To activate processing of Spring's @Transactional annotation, use the
<tx:annotation-driven/> element in your spring's configuration file.
@Service
public class CompanyServiceImpl implements CompanyService {
 @Autowired
 private CompanyDAO companyDAO;
 @Transactional
 public Company findByName(String name) {
   Company company = companyDAO.findByName(name);
   return company;
 }
 ...
}


The default @Transactional settings are as follows:
  • Propagation setting is PROPAGATION_REQUIRED.
  • Isolation level is ISOLATION_DEFAULT.
  • Transaction is read/write.
  • Transaction timeout defaults to the default timeout of the underlying transaction system, or to none if timeouts are not supported.
  • Any RuntimeException triggers rollback, and any checked Exception does not.
These default settings can be changed using various properties of the @Transactional spring annotation.


Specifying the @Transactional annotation on the bean class means that it applies to all applicable business methods of the class. Specifying the annotation on a method applies it to that method only. If the annotation is applied at both the class and the method level, the method value overrides if the two disagree.


@Scope
As with Spring-managed components in general, the default and most common scope for autodetected components is singleton. To change this default behavior, use @Scope spring annotation.


@Component
@Scope("request")
public class ContactResource {
...
}
Similarly, you can annotate your component with @Scope("prototype") for beans with prototype scopes.


Please note that the dependencies are resolved at instantiation time. For prototype scope, it does NOT create a new instance at runtime more than once. It is only during instantiation that each bean is injected with a separate instance of prototype bean.


Pluggability of other MVC implementations


Non-Spring MVC implementations are preferable for some projects. Many teams expect to leverage their existing investment in skills and tools, for example with JSF.
If you do not want to use Spring’s Web MVC, but intend to leverage other solutions that Spring offers, you can integrate the web MVC framework of your choice with Spring easily. Simply start up a Spring root application context through its ContextLoaderListener, and access it through its ServletContext attribute (or Spring’s respective helper method) from within any action object. No "plug-ins" are involved, so no dedicated integration is necessary. From the web layer’s point of view, you simply use Spring as a library, with the root application context instance as the entry point.
Your registered beans and Spring’s services can be at your fingertips even without Spring’s Web MVC. Spring does not compete with other web frameworks in this scenario. It simply addresses the many areas that the pure web MVC frameworks do not, from bean configuration to data access and transaction handling. So you can enrich your application with a Spring middle tier and/or data access tier, even if you just want to use, for example, the transaction abstraction with JDBC or Hibernate.

Web Development

Design Phase:- Below all these represent different stages of the UX/UI design flow:- Wireframes represent a very basic & visual repr...