Spring 4 MVC RESTful Service
Spring 4 provides support for developing RESTful services using Spring 4 @RestController annotation.
Spring 4 MVC based RESTful JSON service - Jackson library [jackson-databind.jar]
Spring 4 MVC based RESTful XML service - Jackson XML extension library [jackson-dataformat-xml.jar]
Additionally, We will go a step further by annotating the domain class with JAXB annotations to support XML in case Jackson’s XML extension library is not available for some reason.
We are using @RestController annotation, which marks this class as a controller where every method returns a domain object/pojo instead of a view. It means that we are no more using view-resolvers, we are no more directly sending the html in response but we are sending domain object converted into format understood by the consumers. In our case, due to jackson library included in class path, the Message object will be converted into JSON format[ or in XML if either the jackson-dataformat-xml.jar is present in classpath or Model class is annotated with JAXB annotations].
In order to test it, you can use either the browser or a true-client.POSTMAN is a nice tool to test your REST Endpoints as in a real scenario. Advantage of Postman is that you can send the “Accept” header along with request which will then be used by Spring while sending the response in required format. With browsers it is not so straight-forward to send the “Accept” Header but you can suffix the URL with format[.json/.xml] to get similar results.
The key difference between a traditional Spring MVC @Controller and the RESTful web service @RestController is the way the HTTP response body is created. While the traditional MVC controller relies on the View technology, the RESTful web service controller simply returns the object and the object data is written directly to the HTTP response as JSON/XML by registered HttpMessageConverters.
Traditional Spring MVC Workflow
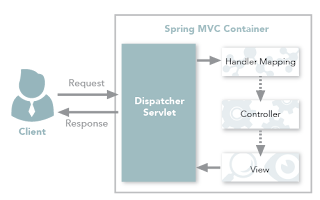
Step 1: The browser or client sends a request to the web application.
Step 2: The request lands to the dispachter servlet and consult with handler mapping.
Step 3: The Handler mappings defined in the application context file, this has information about which is controller need to be invoked.
Step 4: The controller will be invoked and it can request the model for some information using DAOs and Services.
Step 5: After Requests are processed by the Controller and the response is returned to the DispatcherServlet with logical view name
Step 6: Then return to the view resolver prepared the view based on your configuration decide the which configuration (JSP, Velocity, PDF etc.) to be invoked.
@Controller
public class AccountController {
@RequestMapping(value="/account", method=RequestMethod.GET)
public ModelAndView get(Long accountId) {
//Process model object
return new ModelAndView("account-detail", model) ;
}
}
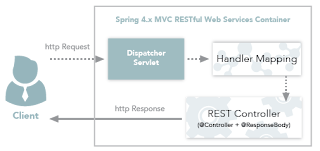
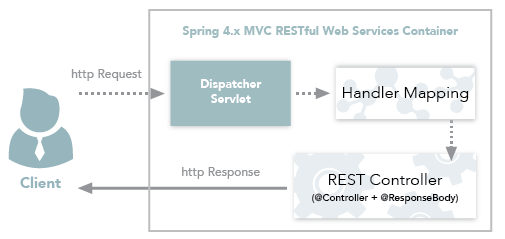
Spring MVC REST Workflow

Step 1: The client sends a request to a web service in URI form.
Step 2: The request lands to the dispachter servlet and consult with handler mapping.
Step 3: The Handler mappings defined in the application context file, this has information about which is controller need to be invoked.
Step 4: The controller will be invoked and process model.
Step 5: Requests are processed by the Controller and the response is returned to the DispatcherServlet which then dispatches to the view.
@Controller
public class restClassName{
@RequestMapping(value={"/uri"})
@ResponseBody
public ObjectResponse functionRestName(){
//...
return instance
}
}
In Traditional Spring MVC Workflow, notice that controller return the ModelAndView object with logical view name to dispactcher servlet, it is forwarded to the ViewResolver in step 6. But in the Spring MVC REST Workflow, Spring lets you return data directly from the controller, without looking for a view, using the @ResponseBody annotation on a method. As of Spring Version 4.0, this process has been more simplified by the @RestController annotation.
Using the @ResponseBody Annotation
If any handler method of controller class is annotated with @ResponseBody, Spring converts the return value of this method and writes it to the http response automatically. @ResponseBody is treated as the view here among MVC and it is dispatched directly instead being dispatched from Dispatcher Servlet and the respective converters convert the response in the related format like text/html, application/xml, application/json .
What is Behind the @ResponseBody
There is a list of HttpMessageConverters registered in the background when we enable Spring web mvc feature to the web application by using @EnableWebMvc or <mvc:annotation-driven> namespace. HTTPMessageConverter is responsible to convert the request body to a specific class and back to the response body again, depending on a predefined mime type.
Spring 4 MVC REST Controller Service
@RestController annotation is introduced as of Spring 4.0, it is actually combination of @Controller and @ResponseBody. It is a convenience way to use this annotation instead of using @Controller and @ResponseBody annotations. By annotating the controller class with @RestController annotation, you no longer need to add @ResponseBody to all the request mapping methods. The @ResponseBody annotation is active by default.
@RestController
public class restClassName{
@RequestMapping(value={"/uri"})
public ObjectResponse functionRestName(){
//...
return instance
}
}
So @RestController let's you expose Rest APIs in Spring 4.0 and above.
Can @Controller annotation be used for both Web MVC and REST applications?
If yes, how can we differentiate if it is Web MVC or REST application.
Spring 4 provides support for developing RESTful services using Spring 4 @RestController annotation.
Spring 4 MVC based RESTful JSON service - Jackson library [jackson-databind.jar]
Spring 4 MVC based RESTful XML service - Jackson XML extension library [jackson-dataformat-xml.jar]
Additionally, We will go a step further by annotating the domain class with JAXB annotations to support XML in case Jackson’s XML extension library is not available for some reason.
We are using @RestController annotation, which marks this class as a controller where every method returns a domain object/pojo instead of a view. It means that we are no more using view-resolvers, we are no more directly sending the html in response but we are sending domain object converted into format understood by the consumers. In our case, due to jackson library included in class path, the Message object will be converted into JSON format[ or in XML if either the jackson-dataformat-xml.jar is present in classpath or Model class is annotated with JAXB annotations].
In order to test it, you can use either the browser or a true-client.POSTMAN is a nice tool to test your REST Endpoints as in a real scenario. Advantage of Postman is that you can send the “Accept” header along with request which will then be used by Spring while sending the response in required format. With browsers it is not so straight-forward to send the “Accept” Header but you can suffix the URL with format[.json/.xml] to get similar results.
The key difference between a traditional Spring MVC @Controller and the RESTful web service @RestController is the way the HTTP response body is created. While the traditional MVC controller relies on the View technology, the RESTful web service controller simply returns the object and the object data is written directly to the HTTP response as JSON/XML by registered HttpMessageConverters.
Traditional Spring MVC Workflow

Step 1: The browser or client sends a request to the web application.
Step 2: The request lands to the dispachter servlet and consult with handler mapping.
Step 3: The Handler mappings defined in the application context file, this has information about which is controller need to be invoked.
Step 4: The controller will be invoked and it can request the model for some information using DAOs and Services.
Step 5: After Requests are processed by the Controller and the response is returned to the DispatcherServlet with logical view name
Step 6: Then return to the view resolver prepared the view based on your configuration decide the which configuration (JSP, Velocity, PDF etc.) to be invoked.
@Controller
public class AccountController {
@RequestMapping(value="/account", method=RequestMethod.GET)
public ModelAndView get(Long accountId) {
//Process model object
return new ModelAndView("account-detail", model) ;
}
}
Spring MVC REST Workflow

Step 1: The client sends a request to a web service in URI form.
Step 2: The request lands to the dispachter servlet and consult with handler mapping.
Step 3: The Handler mappings defined in the application context file, this has information about which is controller need to be invoked.
Step 4: The controller will be invoked and process model.
Step 5: Requests are processed by the Controller and the response is returned to the DispatcherServlet which then dispatches to the view.
@Controller
public class restClassName{
@RequestMapping(value={"/uri"})
@ResponseBody
public ObjectResponse functionRestName(){
//...
return instance
}
}
In Traditional Spring MVC Workflow, notice that controller return the ModelAndView object with logical view name to dispactcher servlet, it is forwarded to the ViewResolver in step 6. But in the Spring MVC REST Workflow, Spring lets you return data directly from the controller, without looking for a view, using the @ResponseBody annotation on a method. As of Spring Version 4.0, this process has been more simplified by the @RestController annotation.
Using the @ResponseBody Annotation
If any handler method of controller class is annotated with @ResponseBody, Spring converts the return value of this method and writes it to the http response automatically. @ResponseBody is treated as the view here among MVC and it is dispatched directly instead being dispatched from Dispatcher Servlet and the respective converters convert the response in the related format like text/html, application/xml, application/json .
What is Behind the @ResponseBody
There is a list of HttpMessageConverters registered in the background when we enable Spring web mvc feature to the web application by using @EnableWebMvc or <mvc:annotation-driven> namespace. HTTPMessageConverter is responsible to convert the request body to a specific class and back to the response body again, depending on a predefined mime type.
Spring 4 MVC REST Controller Service
@RestController annotation is introduced as of Spring 4.0, it is actually combination of @Controller and @ResponseBody. It is a convenience way to use this annotation instead of using @Controller and @ResponseBody annotations. By annotating the controller class with @RestController annotation, you no longer need to add @ResponseBody to all the request mapping methods. The @ResponseBody annotation is active by default.
@RestController
public class restClassName{
@RequestMapping(value={"/uri"})
public ObjectResponse functionRestName(){
//...
return instance
}
}
So @RestController let's you expose Rest APIs in Spring 4.0 and above.
Can @Controller annotation be used for both Web MVC and REST applications?
If yes, how can we differentiate if it is Web MVC or REST application.


No comments:
Post a Comment